Model 122M P8 Mini Interface Meter: Electronics Replacement
Tools and Materials Needed
- 122M (CSA) Complete Electronics Package (#111329)
- Phillips or Robertson (Square Head) Screwdriver
- Small Wrench or Pliers
- Small Flat Screwdriver
- Soldering Iron and Wire

122M (CSA) Complete Electronics Package

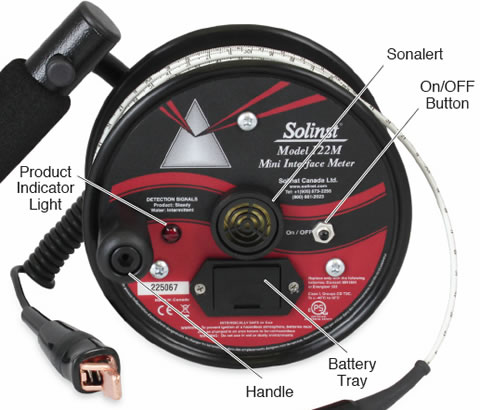
122M P8 (CSA) Mini Interface Meter indicating the location of components
Instructions
- Place the reel on a flat surface, with the faceplate up. Remove the battery from the faceplate.
- Use the Phillips or Robertson screwdriver to undo the three screws holding the faceplate to the hub.
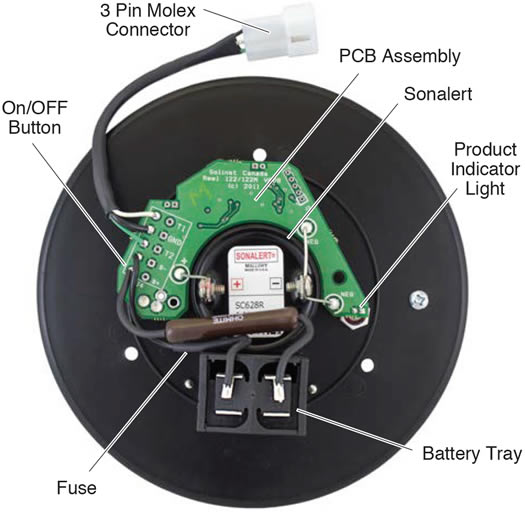
- Remove the faceplate and disconnect the 3 pin Molex connector that attaches the faceplate electronics to the cable.
- Use the soldering iron to unsolder the two wires from the battery tray.
- Use the wrench or pliers to unscrew the nut retaining the On/OFF button on the front of the faceplate.
- By hand, unscrew the Sonalert retaining ring from the front of the faceplate.
- Remove the electronics assembly from the back of the faceplate (PCB assembly, Sonalert, On/OFF button, and product indicator light).
- Line-up and insert the On/OFF button, product indicator light, and Sonalert of the new electronics assembly, through the back of the faceplate. The light will seat in the lens.
- Use the retaining nut to secure the on/OFF button to the faceplate and the retaining ring to secure the Sonalert.
- Solder the two wires to the battery tray. The wire with the brown fuse goes to the positive terminal.
Note:
The red product indicator light lens will remain in the faceplate.

Back of 122M P8 (CSA) SC100 Mini Faceplate showing the location of electronics
- Connect the 3 pin Molex connector to the cable connector.
- Replace the faceplate by fastening three screws and replace the batteries.
- With the Probe in a glass of tap water and product, turn the Mini Interface Meter on. A steady tone and light indicates a product, while an intermittent tone indicates water. If the buzzer or light do not activate, check the soldered and Molex connections.


